コンセプト
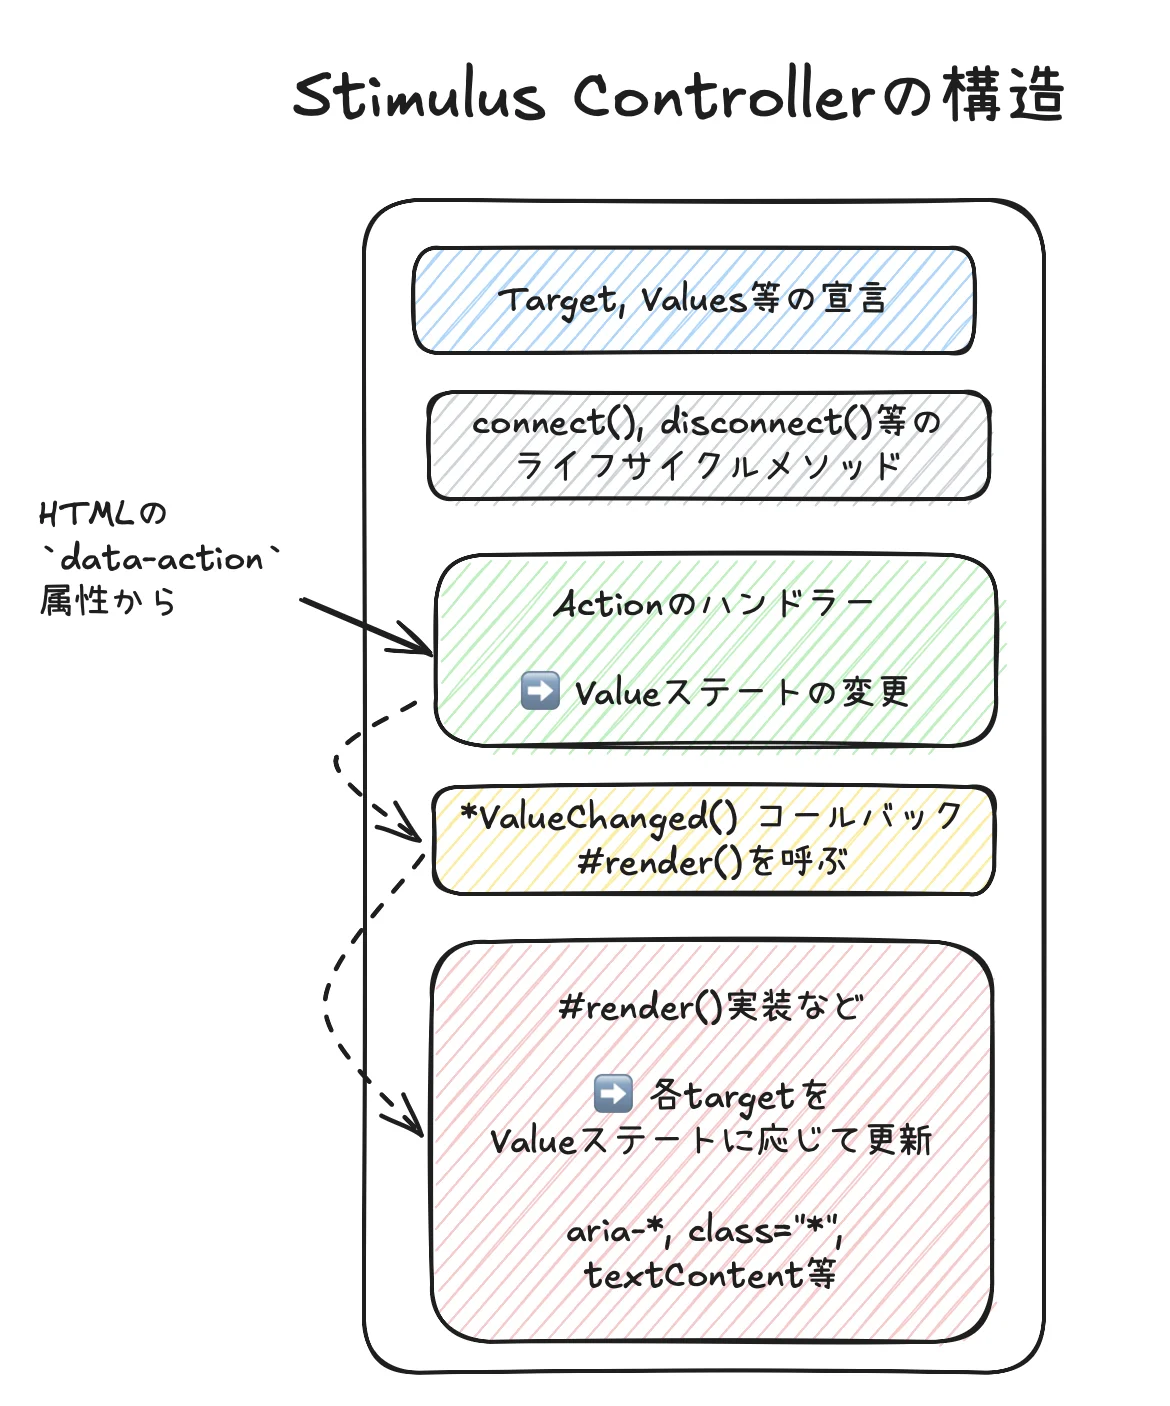
Stimulus Controllerの構造
はじめに
ここでは私がStimulus Controllerを書くときのパターンを紹介します。他人のものとの比較は十分にやっているわけではありませんが、概ね似ているのではないかと思います。
単方向データフロー
Reactが普及させた単方向データフローはロジックがわかりやすく、デバッグしやすいのが特徴です。特に複数のActionが複数のTargetを更新しているケースではロジックが追いやすくなります。
複雑なステートを管理する場合、Stimulusも単方向データフロー的な使い方ができます。ここで紹介するのはこのようなものです。簡単なステートの場合は、ここまで考える必要はありません。
コード例の中には下記の書き方をしているものがたくさんあります。
- 簡単な例: 引き出しの例
- 複雑な例: Apple Store模写の例
具体例
下記はApple Store模写の比較的複雑なStimulus Controllerの例です。各セクションをコメントしていますので、コードの中をご確認ください。
- 私はActionのメソッドの行数を少なくして、RailsのThin Controllerのようにしています。ステートの更新に集中させることで、責務を明確にします(ただしステートを介さないような簡単な処理の場合は直接targetを更新させます)。
- ActionハンドラーとRenderを明確に分けるのは大きなメリットがあると感じています。
- また下記では
IPhoneクラスを用意し、ビジネスロジックは完全に分離収納しています。下記のような処理の流れになります。- Actionで
this.iphoneValueステートを更新する(Valuesステート) #render()するとき、上記ステートでIPhoneクラスを初期化IPhoneクラスのビジネスロジックに応じて、画面を変更する
- Actionで
import {Controller} from "@hotwired/stimulus"
import IPhone from "../models/IPhone"

// Connects to data-controller="iphone-static"
export default class extends Controller {
  // target, values, classes, outlets等の宣言
  static targets = [
    "image", "price", "colorText", "itemPricing",
    "modelForm", "colorForm", "ramForm"
  ]
  static values = {
    catalogData: Object,
    iphone: {type: Object, default: {model: null, color: null, ram: null}}
  }

  // Stimulus Controllerを使うときは真っ先に接続確認をしますので、たいてい残しています。
  // ここに`alert("hello")`などと書いて、接続を確認します。
  connect() {
  }

  // `data-action`によって呼び出されるイベントハンドラ群。
  // Actionと読んだりもします。
  // Actionはなるべく行数を少なくします。RailsのThin Controllerと同じ発想で、
  // なるべく他のメソッドに処理を委任します。
  //
  // 簡単な場合はActionの中でHTMLのCSS属性やちょっとした内容を変更しますが、
  // 多くの場合はステートを変更するのにとどめます。ステートに基づいて実際に
  // HTMLを変更するのは、複雑になってきたらなるべく`#render()`のようなもので
  // まとめて処理します。
  updateOption(event) {
    const {name, value} = event.currentTarget
    this.iphoneValue = {...this.iphoneValue, [name]: value}
  }

  updateColor(event) {
    const color = event.currentTarget.value
    this.iphoneValue = {...this.iphoneValue, color: color}
  }

  // この2つのActionはステートを介さないような簡単な処理をする箇所です。
  // そのためにActionの中で直接targetを更新しています。
  setColorText(event) {
    const colorName = event.params.colorName
    const colorFullName = this.catalogDataValue.colors[colorName].full_name
    this.colorTextTargets.forEach(target => target.textContent = colorFullName)
  }

  resetColorText(event) {
    this.colorTextTargets.forEach(target => target.textContent = this.iphone.fullColorName())
  }

  // Stimulus `Values`でステートを管理している場合は、Valueが変更されたら自動的に
  // 呼び出される`*ValueChanged`コールバックを使います。
  iphoneValueChanged() {
    this.#render()
  }

  // 少し複雑になって、複数のtargetを更新するControllerの場合は、すべてまとめて
  // #render()に記載します。
  //
  // なおActionによってはすべてのtargetを更新する必要がないものもあります。
  // しかし、どのActionがどのtargetを更新するかを管理するのは大変です。
  // 多少の無駄があっても、常にすべてのtargetを更新するように私はしています。
  // これは差分検出処理がないだけで、割とReactの考え方に近いのではないかと思います。
  #render() {
    // このStimulus Controllerではステートマシン的な管理や価格計算が行われています。
    // Controllerにそのロジックを入れるとかなり大きくなってしまうので、
    // 別途 `Iphone` モデルを作って使用しています。
    // あくまでもControllerは **Action ==> Valuesなどのステート ==> targets** の
    // フローを管理するものとして切り分けます。
    this.iphone = new IPhone(this.iphoneValue, this.catalogDataValue)
    this.#renderImageTarget()
    this.#renderPriceTarget()
    this.#renderColorTextTargets()
    this.#renderItemPricingTargets()
    this.#renderFormTargets()
  }

  // targetごとにレンダリングするメソッドを分けます
  #renderImageTarget() {
    this.imageTarget.src = this.iphone.imagePath()
  }

  #renderPriceTarget() {
    const price = this.iphone.price()
    this.priceTarget.textContent =
      `From ${price.lump.toFixed(2)} or ${price.monthly.toFixed(2)}`
  }

  #renderColorTextTargets() {
    const colorText = this.iphone.fullColorName()
    this.colorTextTargets.forEach(e => e.textContent = colorText)
  }

  #renderItemPricingTargets() {
    this.itemPricingTargets.forEach(e => {
      const name = e.dataset.iphoneStaticPricingName
      const value = e.dataset.iphoneStaticPricingValue
      const pricing = name === "model"
                      ? this.iphone.pricingFor(value, this.iphone.ram)
                      : this.iphone.pricingFor(this.iphone.model, value)
      e.innerHTML = `
        <div class="text-xs text-gray-500 text-right">From \$${pricing.lump.toFixed(2)}</div>
        <div class="text-xs text-gray-500 text-right">or \$${pricing.monthly.toFixed(2)}</div>
        <div class="text-xs text-gray-500 text-right">for 24 mo.</div>
      `
    })
  }

  #renderFormTargets() {
    this.modelFormTarget.disabled = !this.iphone.canEnterModel()
    this.colorFormTarget.disabled = !this.iphone.canEnterColor()
    this.ramFormTarget.disabled = !this.iphone.canEnterRam()
  }
}
まとめ
- 簡単な場合はStimulus Controllerはどのように書いても整理ができます
- しかしある程度複雑になると、Reactの単方向データフローと同じように、データフローを整理した方がわかりやすくなります。StimulusはそのためのValuesステートを用意しています
